Showing posts with label candle holders. Show all posts

Tuesday, 17 April 2012

gyertyatartó / candle holder

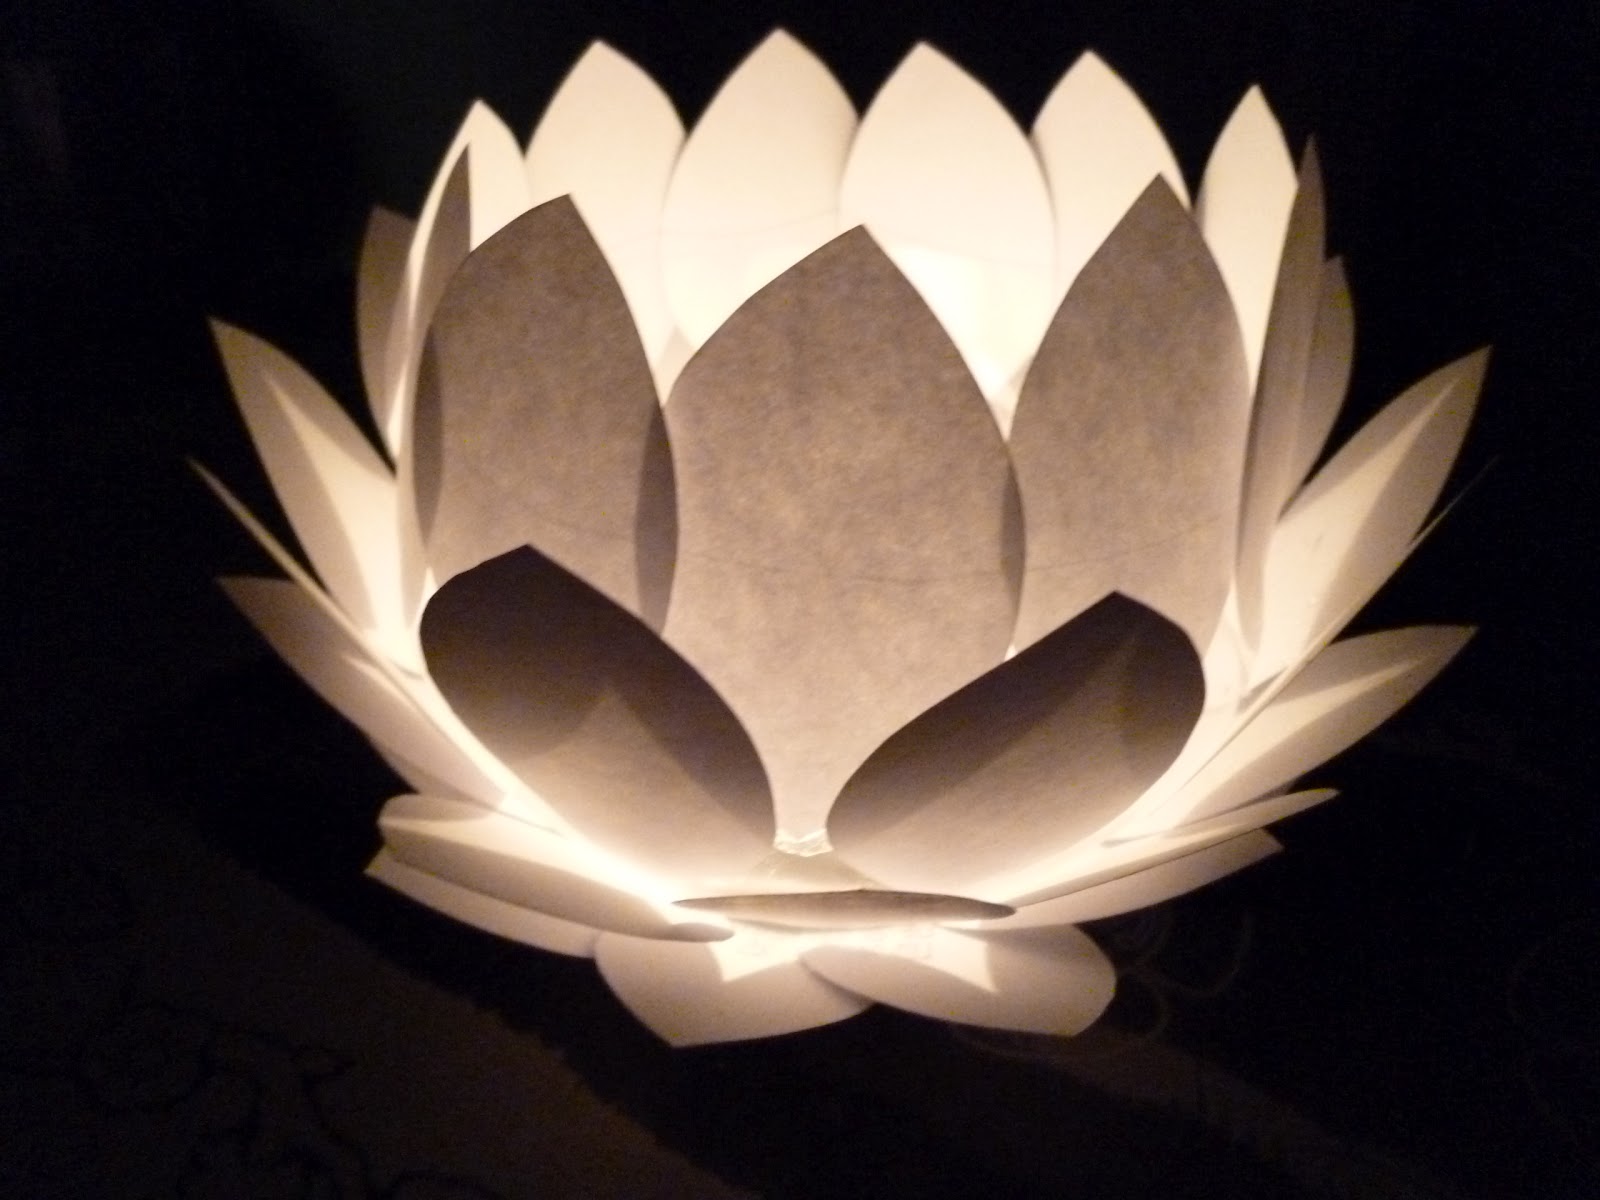
Láttam valahogy a világhálón egy nagyon érdekes kézműves gyertyatartót. Talpas üvegpohárra ragasztottak szirom formájú papírdarabokat, s a végeredménynek valamiféle virág alakja lett. Nagyon mutatós és elegáns volt, esküvőkre, különleges alkalmakra ajánlották. Addig izgatta a fantáziámat, hogy valami módon én is ki kellett próbáljam. Mivel talpas üvegpoharam nincs itthon (volt 6 darab, de sorra mind eltört, a férjemmel borkedvelők vagyunk :) ), improvizálnom kellett. Egy üres műanyag palacknak a tetejét vágtam le, felfordítottam, s erre ragasztottam az egyszerű fénymásoló papírból kivágott szirmokat. A papírragasztó nem nagyon fogta oda a papírt a műanyaghoz, a szirmok állandóan estek le amíg meg nem száradtak teljesen, úgyhogy legközelebb ezen változtatnom kell. A belsejébe csak bele kell tenni a gyertyát, óvatosan meggyújtani, és máris megvan a csodálatos hangulatvilágítás. Persze lehet színespapírt is használni, vagy színes műanyagpalackot, így színt is ad az estének, nem csak fényt :)

***************************************************************************************************************************
I saw an interesting handmade candle holder once on the internet. It was a wine glass decorated with paper elements and the result resembled some kind of flower, a lotus maybe. It was very decorative and elegant, was suggested as a centerpiece for wedding tables or other special occasions. I wanted to try to make something like it, but because I don't have wine glasses at home (...any more... I had 6, but my husband and I like to drink some wine occasionally, and they all broke eventually :) ) I had to improvise. I cut off the top 10 centimeters of a transparent plastic bottle, cut out some petal shapes from white copy paper and glued them to the plastic top. I used crafting glue, but wasn't strong enough, the petals kept falling down. Now they're dried and the candle holder is a bit safer to handle. I put a tealight in the middle and there you go, some moodlighting for a romantic evening :) Of course coloured paper can be used as well, or coloured plastic bottles if you want to add more effect.


Tuesday, 14 February 2012

quilling gyertyatartó / quilled candle holder

Egy kis Bálint-napi ajándék...

*********************************************************************************
A small Valentine's Day gift...


Monday, 6 February 2012

quilling gyertyatartó / quilled candle holder

Tavaly készítettem egy ilyen kis gyertyatartót, s kértek még hetet. Volt egy kis munka velük :)

*********************************************************************************
Last year I made a candle holder like this and they asked for seven more. So I've been quite busy lately :)


Monday, 30 January 2012

how to make a quilled candle holder / hogyan készíts quilling gyertyatartót

 I've been receiving positive feedback on my quilled candle holders, even a request to make a tutorial! I can't tell you how honored I am that someone wants to learn something from me. So I'll share my way of making these candle holders. They can be of many shapes and colours, but since I prefer round and red, and taking into account the upcoming Valentine's day, it's going to be something like this... I dedicate this tutorial to Karen Davis and everyone who takes time to peek into my work , thank you for being interested!

*******************************************************************************************************************
Pozitív visszajelzéseket kaptam a quilling gyertyatartóimmal kapcsolatban, ezért gondoltam megosztom veletek én hogyan készítem őket. Sokféle színű és formájú lehet egy ilyen gyertyatartó, s mivel jobban szeretem a kör alakút és a piros színűt, tekintettel a közeledő szerelmesek napjára, most ilyen lesz :)


I started with a clean, flat, plain piece of carton (the remains of a pizza box) but any type of cardstock which is hard enough would do.


 Draw a circle on it (or any shape that you'd prefer)...
 ...then cut it out. Making the base hard enough, or having a base at all, will assure more stability to the  candle holder
 Cut out two circles of coloured copy paper, one of the size of the cardboard, the other slightly bigger (at least 2-3 cm bigger)
 Glue the bigger circle to the cardboard.
 Cut in the margin.

 Glue the margin to the cardstock.
 When completed, it'll look something like this:
 Glue the smaller circle to the cardboard, so it will cover it completely.
 It will look something like this, but don't worry, this will be the bottom, it won't be visible, and we'll decorate the other side...
 ...this one. It's flat and clean.
 Put the candle in the middle and draw a circle around it.

 You're ready with the base, now prepare the strips for the decoration. I work with A4 size coloured paper, and manually cut it into 1 cm strips. It is easier to work with some thinner cardboard (120-130 mg) than with simple copy paper, because it holds the modeling, and the coils won't open so fast.
 Make some tight coils. The number of the coils depends on the thickness of the paper.
 Glue them to the carton, around the drawn circle.
 Then make some marquises (I'm not sure what's the plural for that word...) and fill in the empty space.
 Put a candle in the hole and there you are... :)

 It looks better with a little shine on it :) I use waterbased glossy enamel.
 I hope you enjoyed it!